
If anyone tried to profile my "style" it would be, at best, eclectic. At worst, disjointed and fickle. Case in point: I saw a $98 clock on Fab.com that made me look twice. That little "I can make that" voice went off in my head like a siren... after all, how cool would it be to turn an expensive "Fab" into a "ReFab"? On the other hand, it's not quite "me". There's an aesthetic out there epitomized, for me, by Ariele Alasko. It resonates for me.
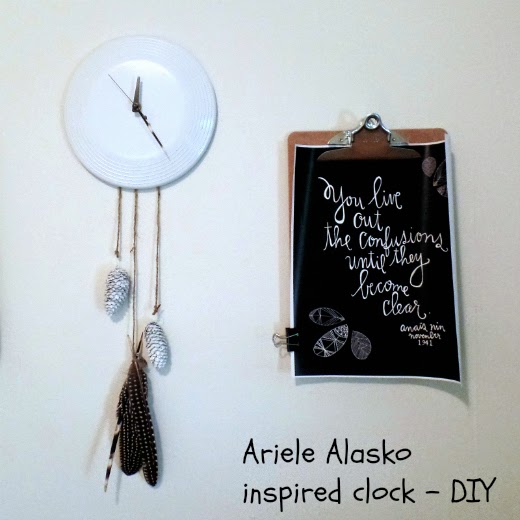
Ariele creates wonders with wood. And her Instagram feed is my daily reminder that I'd really just like to go live in a treehouse. That's a shot of her home above ... see the bones, feathers, wood etc? I love that look - I think it's the African upbringing. Sort of industrial-naturalist? Hip-folk? Boho-noir? I have no idea. I just like it. So when I ultimately made my Fab clock, it included real pinecones, feather-of-guinea-fowl and quill-of-porcupine! And it cost around $8.
Ariele creates wonders with wood. And her Instagram feed is my daily reminder that I'd really just like to go live in a treehouse. That's a shot of her home above ... see the bones, feathers, wood etc? I love that look - I think it's the African upbringing. Sort of industrial-naturalist? Hip-folk? Boho-noir? I have no idea. I just like it. So when I ultimately made my Fab clock, it included real pinecones, feather-of-guinea-fowl and quill-of-porcupine! And it cost around $8.

It's a 99c dog frisbee! Hah! I wanted to use an old dinner plate. I destroyed several drill bits trying to make that happen. Apparently you really do need a diamond-tipped ceramic bit (or something) to make a hole in a plate (don't believe anything Martha tells you). Since I didn't want to buy anything special for this project, I waited until something else presented itself. A plastic dog toy? Yes.
Materials:
1. Frisbee, plate etc
2. Cord of some sort. I used Jute but I think the cording for macrame would look lovely.
3. Pinecones and whatever other goodies you might like.
4. Spray paint appropriate for your plate / frisbee.
5. A basic mini-quartz clock movement and hands. I once had a reason to buy such things in bulk and shopped at Clockparts, but you can buy them at any hobby store. Pay attention to the length of the threaded shaft - if you use an ordinary dinner plate, you won't need one longer than 3/4".
5. A drill

Find the center of the disk. Then, drill the hole using the thickest drill bit and go back and forth a few times. The hole will still not be quite big enough. Solution: push a standard pencil through it. If you cannot get the pencil through the hole, go back at it with the drill. Grind out the hole as evenly as you can then try the pencil again. Once you can get it through, the clock shaft will fit.

If you're using real pinecones, you'll need to wire them. I didn't do anything fancy here ... just be gentle and create a basic loop.

The painting is always fun! Although I messed up a little. See the little puckers in the paint at the bottom? Possibly too much paint for the first coat? It only happened in the small patch you can see so I carried on.

Now tie on the cord. I wired the feather and quill together then attached them to the clock hanger (hangers come standard with the movements).

There are small holes on either side of a movement. I threaded the pinecone cords through these holes because that creates enough distance between them when they hang.

Here's a little detail "pendulum" detail.

I cut and glued a porcupine quill to the long clock hand - you can't do this to both. They have to be able to cross one another.

And there it is. On a wall in my bedroom between Anais Nin quotes which seems, somehow, appropriate.
Add your comment