the ReFab Diaries: upcycle
Showing posts with label upcycle

This week, friends of mine in the UK created for themselves a wonderous Ale-vent calendar ... inspired by CAMRA. It might be the best take on a grown-up advent I've seen!  And it's really simple to make - paper-wrapped bottles ... printable numbers. I'm wondering about refrigeration (I like my beer cold!) ... I should ask them.

Anyways, I love countdowns, so there's usually some sort of advent calendar in my house (see last year's book/gift calendar for Ms Ro). And I don't think they're just for kids! The holiday season is stressful, so why shouldn't we get a little gift for every day we survive it??  Here are 11 more adult-friendly advents to DIY:

Haven't put together a big post like this in a while ... because I haven't really been inspired to. Then I saw an old blender on top of the dumpster in our alley and thought "huh - do we even consider fixing small appliances these days?" I don't think so. They get the boot. Perhaps because, in the US anyway, they're so cheap to replace?  So, this collection of refabs began to take shape and I'll add to it as I find fun things. My focus is "stuff you find in a house that has a cord attached".  Pretty broad huh?  

Great example of some thrifty refabbing ... and creative reinterpreting!  Two places to go for a complete tutorial (I've used images from both):  Design Sponge and Courtney Ann
I'm on a kid-whimsy kick this week. And I LOVE this eye-popping upcycle from One More Mushroom. The chair has been yarn-bombed (!), the table painted entirely with chalkboard paint. Which one would you rather have in your home?  :)  Complete how-to (with great pictures) here.


A simple, retro-tastic makeover worthy of a bow. Elycia shares the instructions in a guest post at One Sheepish Girl.


Ok ... another jewelry giveaway for you! I was inspired by all the leafy earrings I saw in Anthropologie's spring collection and transformed some dull silver leaves from thrifted pendant earrings (Detailed post here). Like the negative earrings and pendant I gave away last week, these are carefully made and one-of-a-kind. I'm giving them away because... well, it's a fun thing to do.  :)

All you have to do to enter is leave a comment (please leave your name and/or email address so I can identify and contact the winner!). Not in the US? No problem - happy to ship out of the country.  
Entry closed


Interested in following the doodles? Like Candoodles on Facebook, follow me on Pinterest, join the blog (bottom right) or add it to your favorite reader.

Thanks for looking!


Holy transformation bat-girl! Don't know about you... but I think Taryn took these from "gosh, no thanks" to "ummmm, where can I get a pair?!!"  I know some people who have treasure troves of upholstery samples .... what a great way to use them! Full tutorial at Design, Dining and Diapers.  

Welcome to my first-ever themed week... five posts about repurposing old cameras, 35mm film etc.  At some point you might see the header "putting a positive spin on negatives" because I can't resist.  There might be at least one actual tutorial from your's truly.  And maybe a giveaway.  Another first for me  :)

To start the week with a bang, I present the completely amazing lamp created by Stacie Grissom blogging at Stars for Streetlights.  I'm mesmerized by this thing. And it's doable thanks to her superb instructions. 

Here's the latest T.I.Y. Get the laptop sleeve instructions here

I'm so excited to share this post today!  You know how sometimes, a plan just comes together? You know how sometimes, you realize you're so old you're inadvertently alluding to "The A-Team" - the TV show, not the movie?

Look ... look again.  A pop-tab curtain?  How freakin' cool is that?  Get the how-to here ... (via decorhacks

Gap and Threadless are teaming up for a series of "TIY" (T-It-Yourself) tutorials, with a new one posted every Friday on Gap's Facebook page. In tried-and-tested blogger fashion, photo instructions demonstrate how to turn old t-shirts into... other stuff. I don't think last week's "wall art" idea is very inspiring ... but here it is


 Get the tote bag project here.

A cheap, humble raw material.  A great little DIY necklace. Care of Dismount Creative

Gap and Threadless are teaming up for a series of "TIY" (T-It-Yourself) tutorials, with a new one posted every Friday on Gap's Facebook page. In tried-and-tested blogger fashion, photo instructions will demonstrate how to turn old shirts into fun accessories including flip flops, laptop sleeves, and beach bags. I'm curious to see what they come up with. See the flip flop project here.


Mirrors created with some version of a plastic scoop / spoon ... they're a theme this week.  Apparently these orange scoops come from a brand of formula.  They look like something we got in cans of powdered juice when I was a kid ... one scoop of the stuff into water and you had a neon orange drink.  Wow ... yum (!)  Complete how to here.  

Crafting with bottle caps has been done, done and done.  I know.  But they (the caps) still accumulate... especially if your preferred beverage comes from a brown bottle. Right?  So I am always interested in ways to repurpose them ... and this post focuses on home accessories / decor, v. the many necklace, earring and bracelet options out there. 


The amazing resin serving tray (above) got this post started.  I think it's genius and LOVE the color combination ... great tutorial overall from SomeWhatSimple.  14 more after the jump!


This eye-popping chandelier is created entirely from plastic water bottles.  Visit Oh Happy Day for the completely tutorial.


#6 plastic is nasty, because it's Polystyrene (styrofoam). Most recycling programs won't accept it and it's potentially toxic! Find out more about the numbers you see on plastic products we use here.

If your supermarket IS really still using #6 containers to package food, you should complain. There are many other options available. And if you do find yourself with one of these horrible things in your hands, save it! Because you can make fused beads (think shrinky dinks)!  
 
The original tutorial from Rust and Sunshine has been removed. But this is a really simple craft that requires very little skill and calls for doodling with permanent markers. CLICK HERE for instructions for making shrinky dinks with #6 plastic.


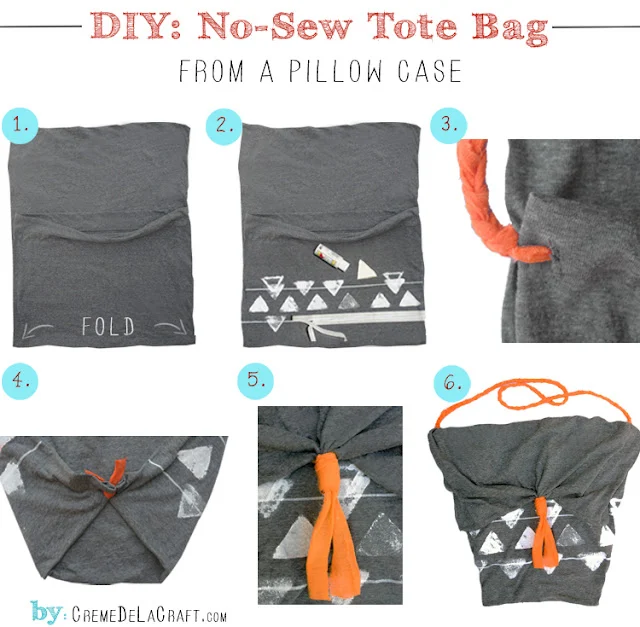
Simple no-sew makeover from CremeDeLaCraft.  


One beat up, $10 desk, a little carpentry, a little paint and hellloooooooooo.... yes please!  Get the how to from Sugar Bee Crafts.
© the ReFab Diaries · THEME BY WATDESIGNEXPRESS
–>